Migrating My DNS to Cloudflare
In the previous post I wrote about why I was leaving Microsoft 365. The first practical step was moving DNS off Microsoft’s infrastructure.
Why Cloudflare
The specific trigger was licensing: once I stopped paying for M365, there was no guarantee Microsoft would keep hosting my DNS for free. I needed a provider I trusted to keep basic DNS free long-term, and Cloudflare has a strong track record on that front.
Cloudflare has been my go-to for personal projects, going back years. Their free tier is compelling, and I was able to fashion my own dynamic DNS using their APIs to access my home lab remotely. Whilst I have since shifted my network to Tailscale, I still use Cloudflare for DNS hosting on other domains I own, CI/CD integrations, CDN, and Compute. To safely minimise the number of services I consume, Cloudflare was the natural choice for my DNS migration.
A quick aside if you also host a website on this domain — Cloudflare bundles some things worth knowing about:
Speed, Resilience and Redundancy: With thousands of networks all around the world, DNS queries for your site are resolved rapidly; consistently among the fastest DNS providers globally.
Security: DDoS protection, Web Application Firewall (WAF), filtering bots, AI agents, SQL injection and protecting your origin IP address from advertised exposure.
Caching: CDN for static content on your site, even on the free plan.
SSL certificates: use a long-term Cloudflare-issued cert locally on your server, and then Cloudflare automatically renews certificates on the public face of your site.
Exporting existing DNS records from M365
Whilst this section is aimed at those who host their DNS records in Microsoft 365, the same principles apply to other Domain Registrar / DNS Management solutions.
From the Admin homepage, go to Settings → Domains admin.cloud.microsoft/#/Domains at the time of writing, and probably will change again).
Download your records in a Zone file, and keep a copy handy as backup, until you have everything fully up and running. It never hurts to keep these somewhere safe for future reference. Ensure you download DNS records for each domain you want to migrate.
Setting up the Cloudflare side
If you haven’t previously signed up with Cloudflare, do so now. Ideally, don’t use an email address that’s hosted on one of the domains you’re transferring — if that domain’s mail breaks, you’d be locked out of the account you need to fix it. Don’t forget to set up a Passkey (or at a minimum, 2FA).
Once logged in, head over to the Domains section and click Add Domain. You can choose to fully transfer your domain to Cloudflare and have them as your registrar, but for this purpose, I chose to simply connect my domain.
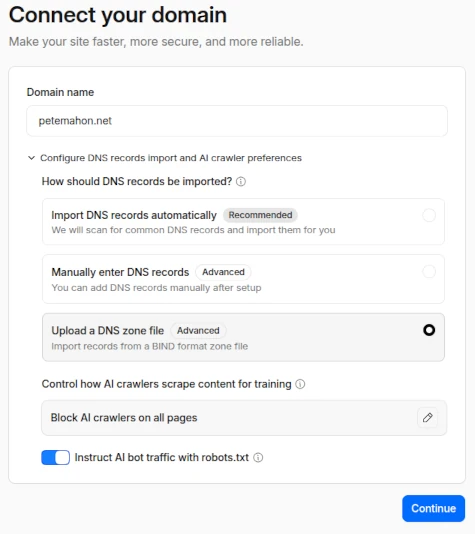
The default settings were fine, as I was planning on copying the existing settings across, as-is, before we change to Proton. However, to be on the safe side, change the option from Import DNS records automatically to “Upload a DNS Zone file”. Cloudflare didn’t pick up all of my records with the automated scan, leaving a few M365-specific records behind.
Thoroughly check that you have migrated all of your zone records before saving; A/AAAA, MX, TXT (including SPF/DKIM/DMARC), CNAME, SRV for autodiscover, and any custom records.
Updating nameservers at the registrar
Once you save your records on Cloudflare, you need to inform the internet that your new DNS record provider is Cloudflare.
Cloudflare will assign you two nameservers, both ending in .ns.cloudflare.com (e.g. amit.ns.cloudflare.com, dave.ns.cloudflare.com) instead of your previous provider’s. Change these at your domain registrar (OnlyDomains, GoDaddy etc).
To do so, log in to your domain registrar, and look for the DNS record section. You should see an area for modifying or delegating nameservers (NS records). Remove the existing records (if using a different provider like Microsoft) and replace them with the two nameservers Cloudflare gave you. Save your records.
Verifying propagation
Whilst your records might be saved, DNS records can take some time to propagate - sometimes hours. Normally, however, Cloudflare will detect the new nameserver records within minutes and display a success message like “Domain Verified”.
To check the records yourself, you can use command line tools or simply go to one of my favourite utility websites, MXToolbox, and use their Supertool.
Enter your domain name in MXToolbox, choose DNS Check from the drop down menu, and click DNS Check:
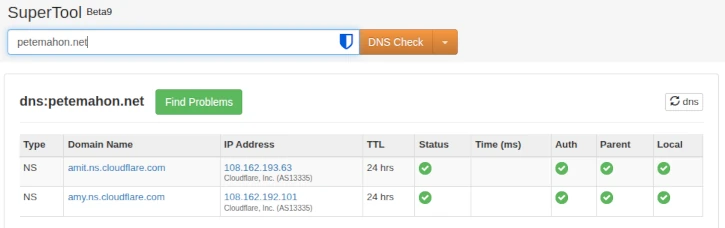
If this is showing Cloudflare servers, but Cloudflare hasn’t updated yet - be patient. Go back to Cloudflare in a few minutes and refresh the page.
Once it’s all verified, you’re good to go. Leave the records intact on the Microsoft side for a minimum of a few hours, just to be safe.
Gotchas I hit
TTL (Time to Live): Check that none of your M365-related records (MX, SPF, DKIM, DMARC) have a TTL longer than 3600 seconds (1 hour) before you cut over. TTL tells resolvers how long to cache a DNS answer — DNS being the internet’s phonebook that translates names like
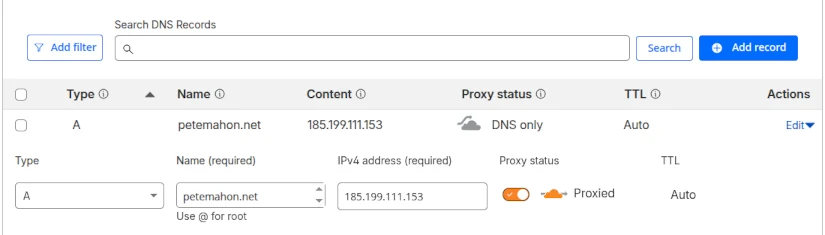
petemahon.netinto addresses your mail client can actually reach. A long TTL means old answers stick around. I’d forgotten my MX records were set to 86,400 seconds — a full 24 hours — which would have left mail hitting the old Microsoft servers for a day after the cutover. This matters in post 3 when we flip MX records to Proton.Cloudflare Proxy Feature: Most DNS records which we will change during this exercise should NOT be proxied with Cloudflare. If your website is hosted on a server and you wish to take advantage of the security features, switch this on in the record editing screen, shown below. However, if like me you are using a provider like Github pages, you don’t need to proxy the data.
Once you’ve finalised the migration of your DNS data, you’re ready for the next step.