Proton Mail on a Custom Domain: Aliases, Catch-all, and Migrating Your Inbox
This is part 3 of a series on moving a personal domain from Microsoft 365 to Proton. Post 1 covered the why, and post 2 moved DNS to Cloudflare. This post is the heart of the migration — getting Proton Mail working on a custom domain, understanding how Proton’s address model differs from what you’re used to, and getting your DNS records right so mail delivery is trusted.
If you’ve landed here straight from a search engine, the earlier posts aren’t prerequisites — you can follow this one standalone, provided you already control your DNS somewhere that lets you add TXT and MX records.
How Proton handles addresses
If you’re coming from Microsoft 365, the mental model for email addresses in Exchange is probably something like this: you have a mailbox, the mailbox has a primary address, and you can tack on a handful of aliases that all deliver to the same inbox. Aliases in M365 are essentially extra labels on the same door. Proton does not have a Shared Mailbox concept currently.
Proton’s model is similar in shape but differs in a few ways that matter in practice.
Primary address. Every Proton account has one. It’s the identity you log in with, and the default From address on outgoing mail. On a custom domain, your primary address is typically you@yourdomain.com, although you will still have your core Proton address of username@proton.me.
Aliases. Additional addresses that deliver into the same inbox. Unlike M365, Proton aliases are first-class: you can send from any of them (choosing the From address per message), and each one can be enabled, disabled, or deleted independently. On paid plans, Proton lets you create a generous number of custom-domain aliases — enough that most people never hit the limit. I haven’t found anything to indicate that they count towards a limit.
Hide-my-email aliases. A separate category. These are randomly-generated addresses (on Proton’s own domain) designed for one-off signups — give one to a service you don’t fully trust, and if it ever starts spamming you or leaks, you disable that alias and the mail stops. M365 has no direct equivalent. I had previously been using DuckDuckGo for this.
Catch-all. A setting on a custom domain rather than a type of address. With catch-all enabled, any address at your domain that doesn’t match an existing alias is delivered to a designated mailbox. So mail to randomword@yourdomain.com lands in your inbox even though you never created that address. Powerful, but double-edged — more on that later. This is not the same as an alias, as you might never email from these addresses.
TL;DR: aliases are deliberate, catch-all is permissive, and hide-my-email is disposable. Most setups end up using at least two of the three.
Creating your Proton Account
If you haven’t done so already, head on over to Proton and sign up for a new account. If you use this referral link you’ll get USD 20 in credits, and Proton gives me a small kickback for the referral.
Adding your custom domain in Proton
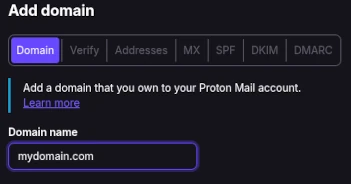
You’ve signed up, or signed in, and you’re ready to add your first custom domain. Go to the Domain section, click Add Domain, and enter your domain name.
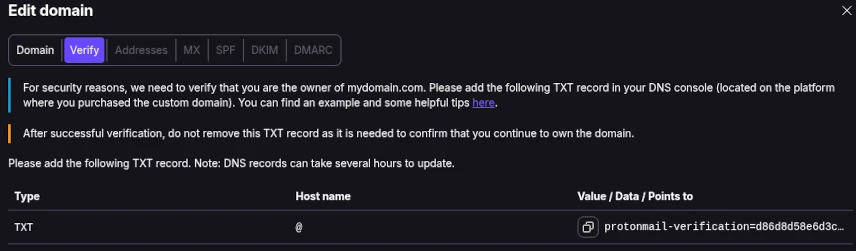
Click Next, and copy the value shown under “Value / Data / Points to” by clicking the Copy icon on the left side of the text.
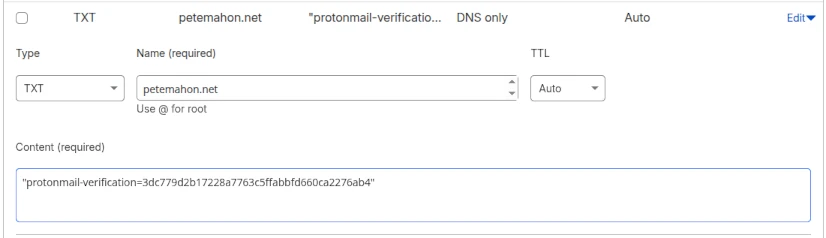
In your Cloudflare DNS Records page, click the Add Record button and enter the verification record. Save the record and go back to Proton.
Click Next, and wait for verification.

You can leave your Proton account for some time at this point and come back later. Your Domains page will look like this until the verification process is completed.

I only had to wait a few minutes for my first domain to be verified, but I got impatient with my second one and ended up requesting Proton support to force verification for the second after about 4 hours or so.
You won’t be able to go to the next step until your domain is verified. Be patient!
Once verified, it’s time to create your first custom domain email address in Proton. Go to the Identity and addresses section.
In the My Addresses section under Display Name and Signature, click Add Proton Address, and enter your primary email address for your custom domain. You can then make this the default email for your account if you would prefer it to proton.me/protonmail.com/pm.me. Remember, these are still valid and available and will deliver to the same mailbox.
Adding your MX Records
Your MX records are how the sender’s email client knows how to route emails addressed to you.
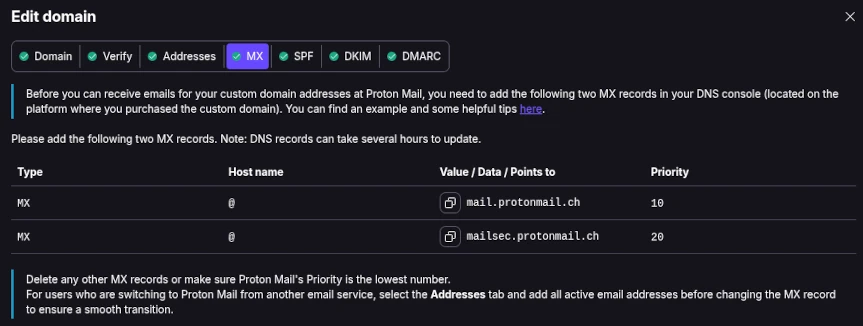
Go back to the Domain names page, and click Review next to your domain. At this point, Domain, Verify and Addresses tab should all be showing green status dots. Click on the MX tab, and copy the value of the first MX record from the list.
Head on over to your Cloudflare Domain Records page.
Before adding your new records, you will need to edit your existing Microsoft MX record in Cloudflare. Click Edit on the MX DNS record. Change the priority of this record to 25 and click Save. Proton requires MX records to advertise priorities of 10 and 20 respectively for its records to verify that your MX records are set up correctly, and we can’t have two MX records with the same priority.
Retaining the Microsoft one whilst we add the Proton ones is key to ensuring you don’t lose a single mail. You might find, if you receive high volumes of email, that emails come to both of your mailboxes in Microsoft or Proton for up to an hour, if the TTL is set to Auto or 3600.
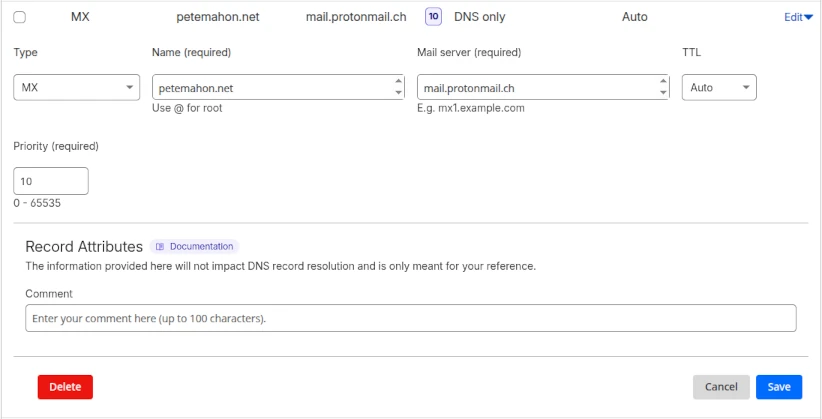
Create your two new Proton MX type records in Cloudflare. The first one is shown below. Be sure to enter the correct priority for the second entry. Click Save when done.
You shouldn’t need to wait long for the next step, as Proton seems to validate MX records immediately. Click Next to go to the SPF tab.
SPF, DKIM, DMARC in Cloudflare
SPF (Sender Policy Framework)
SPF is an authentication mechanism. It allows recipients of your emails to know that an email from your domain came from an authorised mail server. If you don’t have one, anyone can send email from your domain and it won’t be possible to tell if it came from a legitimate source.
Important to note here: If you were setting up your custom domain from scratch (never had email configured previously), you would use the exact settings provided by Proton. However, you are in a transition phase and need to ensure emails can be sent by both Microsoft Exchange and Proton, just in case we have an issue and need to rollback.
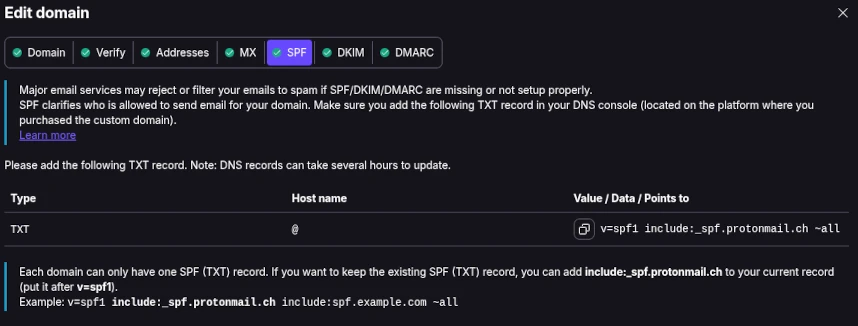
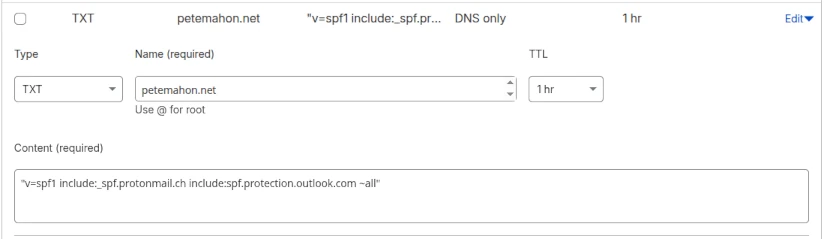
Proton suggests adding v=spf1 include:_spf.protonmail.ch ~all, so we add the Microsoft Exchange SPF to ours as well and instead use "v=spf1 include:_spf.protonmail.ch include:spf.protection.outlook.com ~all".
Ensure you set this up as a TXT type DNS record.
DKIM (DomainKeys Identified Mail)
Recipients of your emails need to be certain that the contents of your email have not been tampered with between the sender and your mailbox, e.g. the integrity of the message is intact.
DKIM does this.
Certain parts of the emails you send (header and body) are hashed, and the resulting hashes encrypted into a DKIM signature by your mail server, using one of your custom domain’s private keys. Your DKIM DNS records are your public keys. The email tells the recipient server which public DNS key to check against to verify the integrity of the message in its entirety. In a non-Proton email exchange (Proton encrypts emails end-to-end), it would be possible to modify the contents during a Man-in-the-Middle attack, but DKIM enables the recipient to immediately spot this and raise a red flag.
If SPF were to pass, and DKIM fail, I would be concerned. This may mean one of the following scenarios:
Message Tampering or Modification
The email content or headers may have been altered in transit, or the DKIM signature was stripped by an intermediate mail server (such as a mailing list or forwarder) that did not preserve the original signature.
DKIM Misconfiguration
The sending server may have an incorrect DKIM private key, the public key may be missing or incorrect in the domain’s DNS records, or the selector used in the signature is wrong.
Expired Signature
The DKIM signature may have an expiration timestamp (t=) that has passed, causing the receiving server to treat the signature as invalid.
Additionally, some companies’ secure email gateways do the verifications before your message ever reaches their mail servers, and fully strip these headers off your emails before they reach the recipients, or further modify the headers of the email to mark it as safe/screened. In both cases, they invalidate your DKIM before it reaches your mail server. PostMark would show these as failing DKIM, and passing SPF (which is likely acceptable).
Let’s go to the DKIM tab in the Domains section of Proton and start copying the records to Cloudflare.
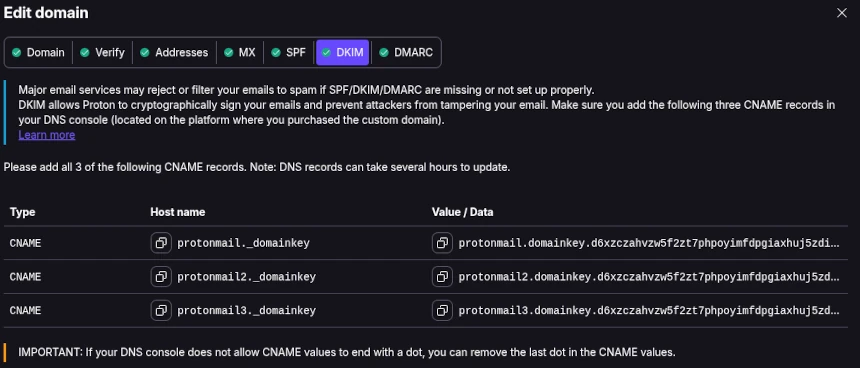
If Microsoft DKIM was set up correctly, you would have two CNAME records already in place for there, named selector1._domainkey and selector2._domainkey. These need to stay for now, same as the SPF records.
Ensure you set these up as CNAME type DNS records.

Do this for all three DKIM records, and click Next.
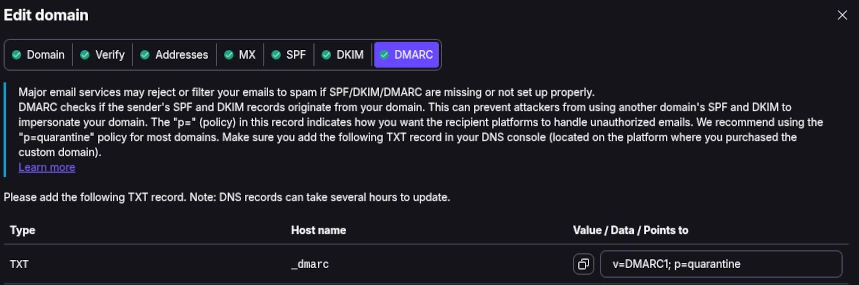
DMARC (Domain Message Authentication, Reporting & Conformance)
If you had a DMARC record set up before, you can likely keep the same record. Now is a good time to review it, and to ensure that you are keeping up to date with current standards.
A DMARC DNS record allows a sender to indicate that their messages are protected by SPF and DKIM, and tells the recipient mail server what to do if both of those authentication methods fails – such as junk/quarantine or reject the message. DMARC limits or eliminates the recipient’s exposure to potentially fraudulent or harmful messages. It also provides a way for the email receiver to report back to the sender about messages that pass or fail DMARC evaluation.
In this case, you might want visibility of who is potentially spoofing your domain. I recommend signing up to another amazing free service called PostMark. The free trial will continue after 14 days, and gracefully degrade to a free “Developer” tier. This allows up to 100 emails a month. I’ve never run into issues with this for my personal domains and I’ve been using it now for 6 years. You will receive a weekly email digest telling you how many emails were sent in that week using your domain name, and how many passed/failed SPF/DKIM checks. If you spot a domain sending emails as your domain, you know something might be up and can investigate further.
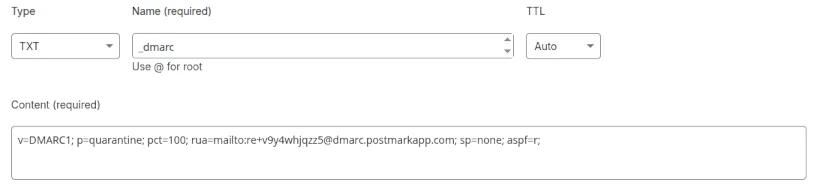
My DMARC record is:
v=DMARC1; p=quarantine; pct=100; rua=mailto:re+v9y4whjqzz5@dmarc.postmarkapp.com; sp=none; aspf=r;
Let me break that down.
| Tag | Value | Name | Explanation |
|---|---|---|---|
v | DMARC1 | Version | Identifies the TXT record as DMARC, Version 1. |
p | quarantine | Policy | Tells the recipient what to do if an email fails both SPF and DKIM. For testing, you can use ’none’, better to have ‘quarantine’, and if you are supremely confident that all your emails will be delivered, you can choose ‘reject’. |
pct | 100 | Percentage | Percentage of messages from this domain to which the DMARC policy is to be applied. I want all my emails tested as I send very low volumes. |
rua | mailto:user@dom.com | Receivers | Email address where feedback is to be sent. Can be multiple addresses, and you can include one of your own email addresses if you’re interested in seeing the content like this mailto:user@dom.com, mailto:me@gmail.com. My record includes the PostMarkApp return address. |
sp | none | Sub-domain Policy | Policy for all subdomains. Same values as for the Policy tag. I don’t send emails from my sub-domains. |
aspf | r | Alignment Mode SPF | If you never use a service to send your emails other than Proton, set this to “s” (strict). If you use any email service like Resend, Mailchimp etc, set it to “r” (relaxed), so that Return-Path addresses for bounce notifications work correctly. |
Save your DMARC record at Cloudflare and ensure it is a TXT type record.
Aliases vs catch-all — when each makes sense
You need an alias when you want to send an email under that identity. If you don’t have a catch-all enabled, you also need to add your alias for that domain to ensure those emails arrive in your mailbox. If you had a shared mailbox in Microsoft 365, you will likely want an Alias to be set up with that email address in Proton.
Add your aliases at https://account.proton.me/u/0/mail/identity-addresses. Scroll to My Addresses and click Add
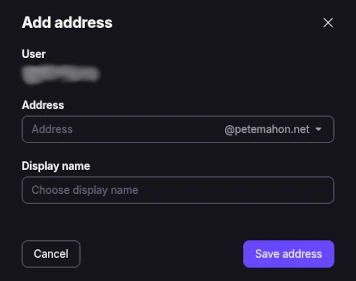
In the list below, you should see at least three active addresses if you have added an alias. One with a Proton domain, the primary email for your domain (main mailbox identity), and your alias. You can set any of the non-default addresses to be your Default. When you send a new message, all of your addresses are in the drop-down in the From: field in your email (a small UX win over Outlook!).
For each of your domains that you have added, you can set up the Catch-All from the Domains screen. Next to your domain name, Click the drop down menu and select Catch-All. Choose the address where these will be redirected to.
Note Whilst it may seem pointless to tell Proton where to send the Catch-All emails, as you only have one mailbox, if you were to sign up for the Duo or Business plans, the administrator might want the Catch-All emails going to a particular security or monitoring mailbox for actioning or forwarding to the correct recipient.
Why aliases are worth the effort
Using a different email address for every service sounds like extra work, but it pays off in ways that become obvious the first time it saves you.
You can see exactly who leaked your details. If the address you gave to an airline starts getting spam, you know it was the airline — not your bank, not that shop you used twice three years ago. That knowledge is strangely satisfying, and it lets you quietly disable the leaked alias without touching anything else.
It breaks cross-service tracking. Advertisers and data brokers love matching profiles across services using a shared email address. Give every service its own alias and that trick stops working on you.
Unsubscribing becomes trivial. If a service starts sending mail you don’t want and their unsubscribe link doesn’t work, you just delete the alias. They can keep sending; it just won’t reach you.
And why catch-all complements it
Catch-all is the opposite instinct — instead of creating deliberate aliases, you accept everything sent to your domain. It’s useful for a different reason: you stop losing mail to typos and bad memory. Someone writes pete.mahon@ instead of peter.mahon@? Still arrives. You signed up to something years ago using an address format you’ve since forgotten? Still arrives.
The combined approach
Most people who go down this road end up using both. Catch-all as the safety net that means no legitimate mail is ever lost to a misspelling; deliberate aliases for the things that matter — accounts you want to track, isolate, or be able to cut off cleanly. You get the privacy benefits of unique addresses and the resilience of never missing a message, without having to choose.
If you chose to set up a Catch-All, your domain page will now have all green statuses against the domain.
